
Example of speeding up inference of PyTorch models on M1 via Core ML tools
I recently read the CVPR 2022 paper titled “Learning to generate line drawings that convey geometry and semantics”, and I found the results quite interesting. Thankfully, the authors have also released their source code, which gave me a chance to try out their models. Unfortunately, running their PyTorch models out of the box on my MacBook with M1 is quite slow. In this post, I will showcase how to convert PyTorch models to Core ML models optimised for inference with Apple’s Neural Engine.
We will use the provided PyTorch models as an example of such a conversion. We will be relying on the authors’ source code and will extend it appropriately step by step. The final results are also available in my fork of the original repository. Since Core ML only supports the inference mode, that is the only aspect of the code that we will be focusing on.
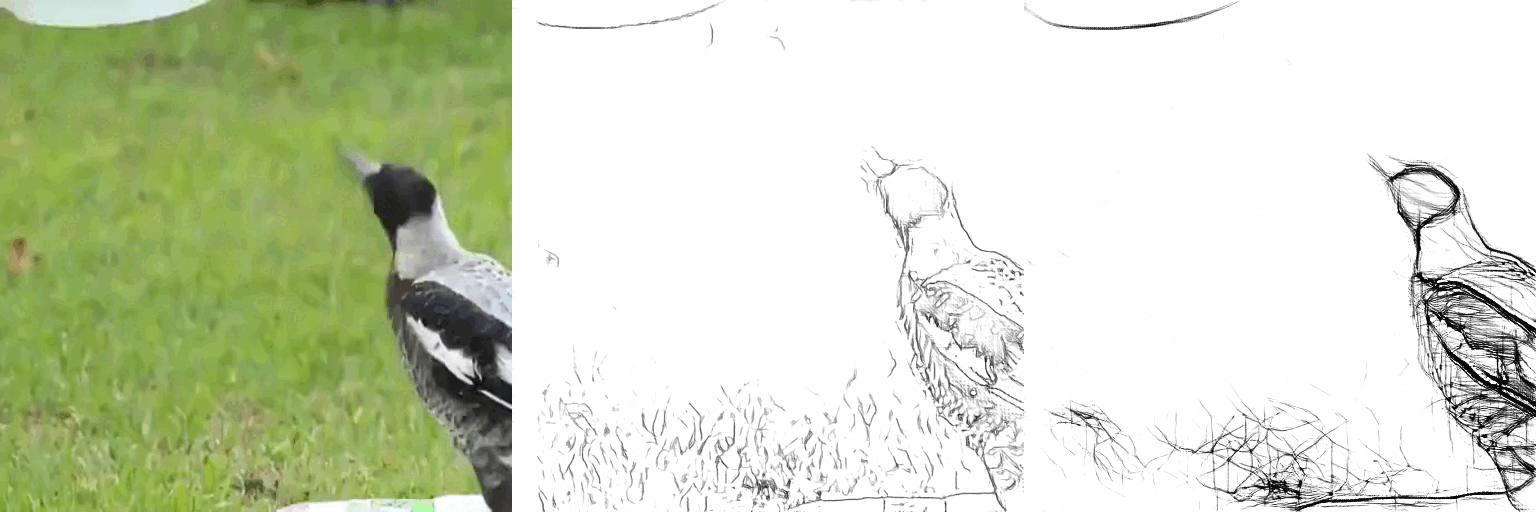
For starters, here is what the provided models do: given an RGB image, they produce a sketch (or a line drawing) which preserves the geometry and semantic information in the image. The authors released 2 models – one which generates sketches in the so-called “anime” style, and one – in the so-called “open-sketch” style.
 |
|---|
| Neural sketching. Input Image->Anime Style->Open Sketch Style |
If you would like to learn more about how exactly the authors achieve that, I recommend reading the paper – it is well written and easy to follow.
Step 0. Pre-requisite: Making code run on CPU
Based on the instructions from the authors’ README, if you run the following on a MacBook or any other device without GPU
python test.py --name anime_style --dataroot examples/test
you will see this message:
Traceback (most recent call last):
  File "test.py", line 69, in <module>
    net_G.cuda()
  File "/opt/homebrew/anaconda3/envs/drawings/lib/python3.8/site-packages/torch/nn/modules/module.py", line 680, in cuda
    return self._apply(lambda t: t.cuda(device))
  File "/opt/homebrew/anaconda3/envs/drawings/lib/python3.8/site-packages/torch/nn/modules/module.py", line 570, in _apply
    module._apply(fn)
  File "/opt/homebrew/anaconda3/envs/drawings/lib/python3.8/site-packages/torch/nn/modules/module.py", line 570, in _apply
    module._apply(fn)
  File "/opt/homebrew/anaconda3/envs/drawings/lib/python3.8/site-packages/torch/nn/modules/module.py", line 593, in _apply
    param_applied = fn(param)
  File "/opt/homebrew/anaconda3/envs/drawings/lib/python3.8/site-packages/torch/nn/modules/module.py", line 680, in <lambda>
    return self._apply(lambda t: t.cuda(device))
  File "/opt/homebrew/anaconda3/envs/drawings/lib/python3.8/site-packages/torch/cuda/__init__.py", line 208, in _lazy_init
    raise AssertionError("Torch not compiled with CUDA enabled")
AssertionError: Torch not compiled with CUDA enabled
To fix that and enable inference on CPU, you can apply this PR – in short, the changes in the PR enforce that the models and input tensors are being sent to the available device not just to CUDA as is done by default.
Step 1. Convert PyTorch models to Core ML
“Core ML is an Apple framework to integrate ML models”. coremltools is a Python package (also from Apple), which among other things provides utilities to convert PyTorch models into the Core ML format and optimise them for inference on devices with Apple Neural Engine. The coremltools documentation is quite good and contains enough starter examples.
The basic steps involved in converting PyTorch models are described here. In short, we initialise the model in PyTorch, then trace it on some random inputs via torch.jit.trace and, finally, let the magic behind coremltools do its thing.
In our case, we are interested in converting a simple network that generates neural sketches.
Since the network is fully-convolutional (meaning it works with inputs of arbitrary spatial sizes),
we also need to make sure that the converted model stays fully-convolutional – for this, we can use unbounded coremltools.RangeDim for height and width (see more here).
For an abstract PyTorch model, the above can be written as:
import coremltools as ct
import torch

my_model = create_pytorch_model()
my_input = torch.rand(1, 3, 224, 224)
traced_model = torch.jit.trace(my_model, my_input)
ct_input = ct.TensorType(
  shape=ct.Shape(
    shape=(
      # batch size is also arbitrary
      ct.RangeDim(),
      3,
      ct.RangeDim(),
      ct.RangeDim(),
    ),
  ),
)
ct_model = ct.convert(
    traced_model,
    inputs=[ct_input],
)
In our particular example, take a look at these lines from my fork of the repository.
If you are “lucky” like me and also encountered the following issue
when converting this model, my quick workaround recommendation is to replace ReflectionPad2d with ReplicationPad2d at model.py.
Results
For profiling, I used 100 512x512 inputs and recorded the time spent on the forward pass using the PyTorch model and using the Core ML model.
| PyTorch model | Core ML model | |
|---|---|---|
| Forward Pass, mean±std, ms | 4835±41 | 156±7.3 |
On my laptop, I got nearly 31x speed-up which is very impressive.
Conclusion
As someone who has been fortunate (or unfortunate) enough to work with deep learning models in different frameworks and across different hardware,
I found my first experience converting a PyTorch model to Core ML incredibly easy (apart from that freaky issue with ReflectionPad).
The speed-up factor achieved was also great. Of course, it is important to note here that the network design was quite simple to start with, and I certainly will not expect the same simplicity
when working with more complicated networks.

Comments